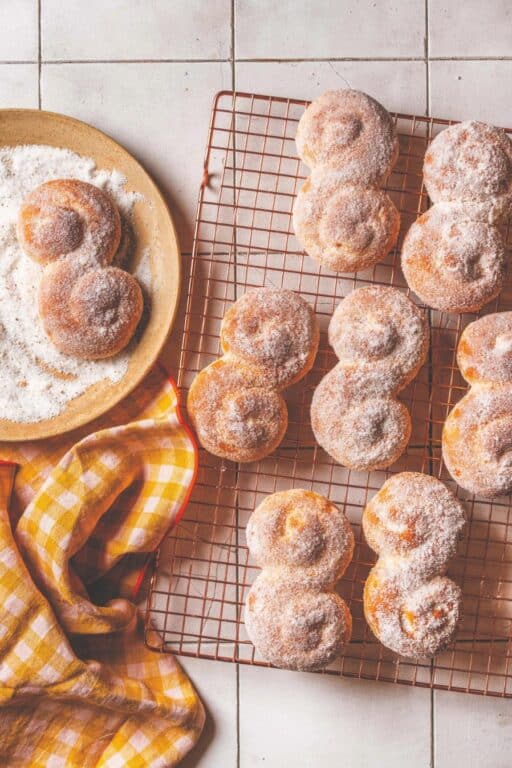
These plush buns, enriched with eggs and olive oil and flavored with candied orange and anise, are a Provençal breakfast treat. They manage to be both sturdy and light, and no matter how carefully you take a bite, invariably some of the sugar coating will rain down on your shirt. C’est la vie! Overachievers can make their own candied orange peel, but a good-quality store- bought candied peel is fine, too. There are scores of different ways to shape these, from bear claw–like paddles to batons, but we like the simplicity of the S-shape.
MAKES 8 BUNS DOUGH
Ingredients:
- 275 grams (2 1⁄4 cups) unbleached all-purpose flour, plus more for dusting
- 25 grams (2 tablespoons) sugar
- 12 grams (1 tablespoon plus 1 teaspoon) instant yeast
- 6 grams (1 teaspoon) fine salt
- 1 large egg (50 grams), at room temperature
- 70 grams (1⁄4 cup plus 1 tablespoon) warm milk, whole preferred
- 70 grams (1⁄4 cup plus 1 tablespoon) warm water
- 14 grams (1 tablespoon) orange blossom water or orange juice
- 12 grams (1 tablespoon) olive oil
- 43 grams (3 tablespoons) unsalted butter, at room temperature
- 47 grams (1⁄4 cup) candied orange peel, homemade or store-bought, cut into 1⁄4-inch dice
- 2.5 grams (1 teaspoon) anise seeds
Instructions:
MAKE THE DOUGH: In a stand mixer bowl, combine the flour, sugar, yeast, salt, egg, milk, water, orange blossom water, and olive oil. Using the dough hook attachment, mix on medium-low speed until a shaggy dough forms, about 1 minute. Scrape down the bottom and sides of the bowl, then increase the speed to medium-high and mix until the dough is smooth and elastic and cleans the sides of the bowl, about 7 minutes. Add the butter 1 tablespoon at a time, mixing on medium speed until the butter is completely incorporated before adding the next tablespoon. Once all the butter has been added, continue mixing the dough until it is shiny and smooth, 1 minute more.
Add the candied orange peel and anise seeds, mixing on medium-low speed until well combined, 1 to 2 minutes. Cover the dough and let rise until puffy though not necessarily doubled in size and when the dough is pressed with a floured finger, a small indentation remains, 1 to 1 1⁄2 hours.
DIVIDE AND PRESHAPE THE DOUGH: Lightly flour a work surface, then use a plastic bowl scraper to gently ease the dough out of the bowl onto the work surface. Divide the dough with a bench knife or a knife into 8 equal portions (each about 75 grams). Deflate each piece of dough by pressing it into a 5-inch oval, then preshape it into a 3- to 4-inch-long tube and place seam side down. Cover and let rest 15 minutes in the refrigerator, which will make it easier to shape. The preshaped dough may be refrigerated up to 24 hours before shaping and baking.
ShAPE ThE DOUGh AND LET RISE: Working with one piece of dough at a time, place one hand in the center of the tube of dough. Begin rolling the dough until it resembles a dog bone, with a thinner center and thicker ends. Using both hands placed directly next to each other, continue rolling the dough into a log while applying light pressure and using a “down-and-out” motion as you roll your hands along the dough. Your right hand will move toward the right end of the log and your left hand will move toward the left end of the log as it gets longer. If the dough is sliding around and difficult to roll (because of too much flour on the surface or on the dough itself), wipe the work surface with a slightly damp cloth or kitchen towel. This will give the dough some tension and make it easier to roll out. Roll each tube of dough out into a 16- to 18-inch-long log. If the dough resists stretching, cover the piece and set it aside for a few minutes while you work on other pieces. This rest gives the gluten time to relax and will make it easier to continue rolling to the desired length. If the dough sticks to the work surface, add just enough flour to prevent sticking.
Line a baking sheet with parchment paper. Shape each log of dough into a swirled “S”: Starting with the left end of a log of dough, gently begin curling the dough clockwise around itself like a snail’s shell, stopping just shy of the halfway point of the log. Repeat the process with the other end of the log to form an “S.” Evenly space the gibassier on the lined baking sheet. Cover and let rise until puffy and when the dough
is pressed with a lightly floured finger, a small indentation remains, 1 to 1 1⁄2 hours.
MEANWHILE, MAKE THE TOPPING: Roughly grind the anise seeds in a coffee/spice grinder or with a mortar and pestle, then add them to the sugar, mixing well to combine. Place the anise sugar in a shallow, wide bowl. Set the melted butter nearby as well.
Toward the end of the rising time, preheat the oven to 375F and arrange a rack in the center.
B A K E : Bake the gibassier until evenly deep golden brown and the internal temperature is 190F, 15 to 18 minutes.
Remove the gibassier from the oven and brush all over (including the bottoms) with the melted butter, then dredge in the anise sugar. Serve warm or allow to cool to room temperature; they’re best the day they are baked.

Excerpted from THE KING ARTHUR BAKING COMPANY BIG BOOK OF BREAD: 125+ Recipes for Every Baker.Copyright @ 2024 by Jessica Battilana, Martin Philip, and Melanie Wanders. Photography Copyright © 2024 by Ed Anderson. Reproduced by permission of Simon Element, an imprint of Simon & Schuster. All rights reserved.